Custom cursors are increasingly popular on modern websites, especially among creative platforms. This feature enhances user engagement by providing a unique and interactive browsing experience.
Custom cursors can reflect your brand’s personality, add a playful element, and make navigation more intuitive, ultimately captivating your audience and keeping them engaged longer.
Webflow Custom Cursor Without Any Code
Here are the 3 steps to create a custom cursor in Webflow without any coding. I hope this ultimate guide helps you with your projects.
Step 1: Making Layouts
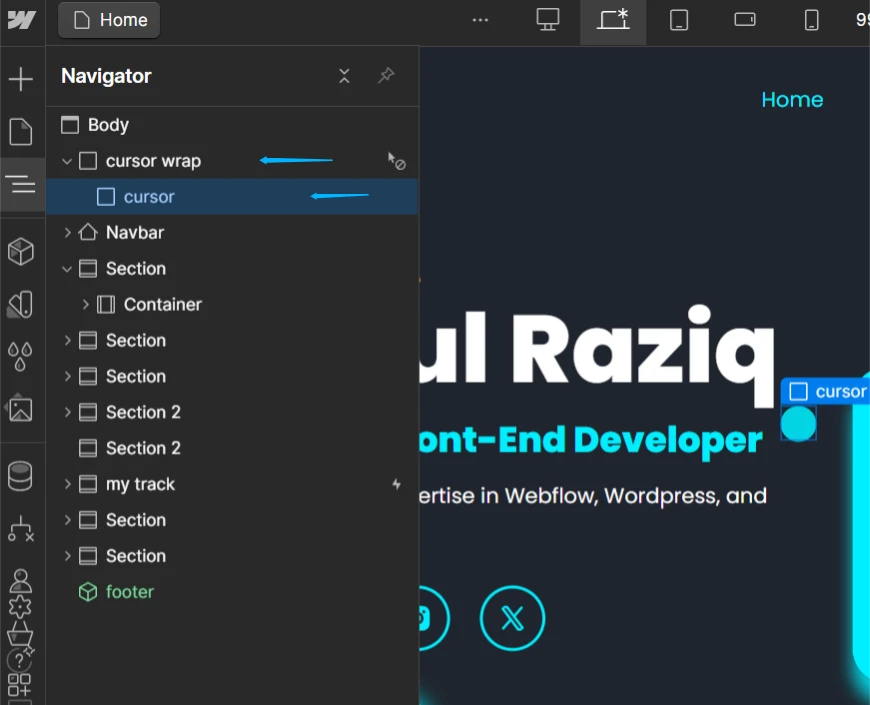
First, create a div and name it “Cursor Wrap” Then, add a new div inside it and name this one “Cursor” Now you can apply styling to your “Cursor Wrap” and “Cursor” divs, which is essential for achieving the desired custom cursor effect.
Body > Div (Cursor Wrap ) > Div (Cursor)
Step 2: Style the Custom Cursor Wrap
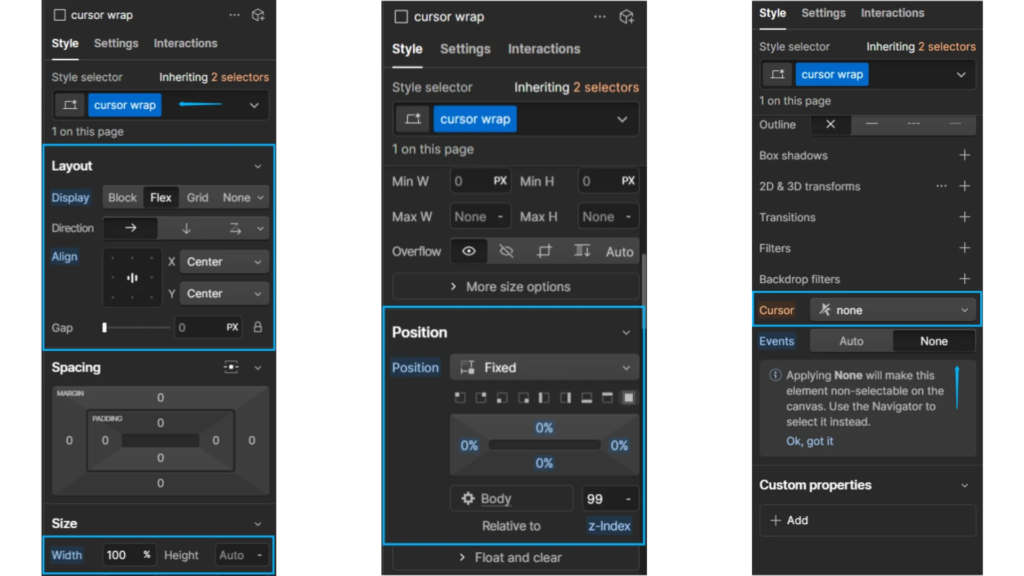
Ensure the Custom Cursor Wrap covers the entire site by setting its position to fixed and applying the following styles:
Cursor Wrap (Style) > Flex + Justify Center
Cursor Wrap (Style) > Position > Fixed > 0% on all sides + z-index (max – 99 )
Cursor Wrap (Style) > Cursor > Select None + Events None (imp)
Note: You can also disable the default cursor by selecting the body element and setting the cursor to none in the third block shown below.
Step 3: Making Cursor And Apply Interactions
Now you can create your custom cursor within the “Cursor” div and apply professional styling to align with your brand.
After styling your cursor div, you can move on to the interactive part. This process is straightforward and involves simple customization to make your cursor respond to user actions.
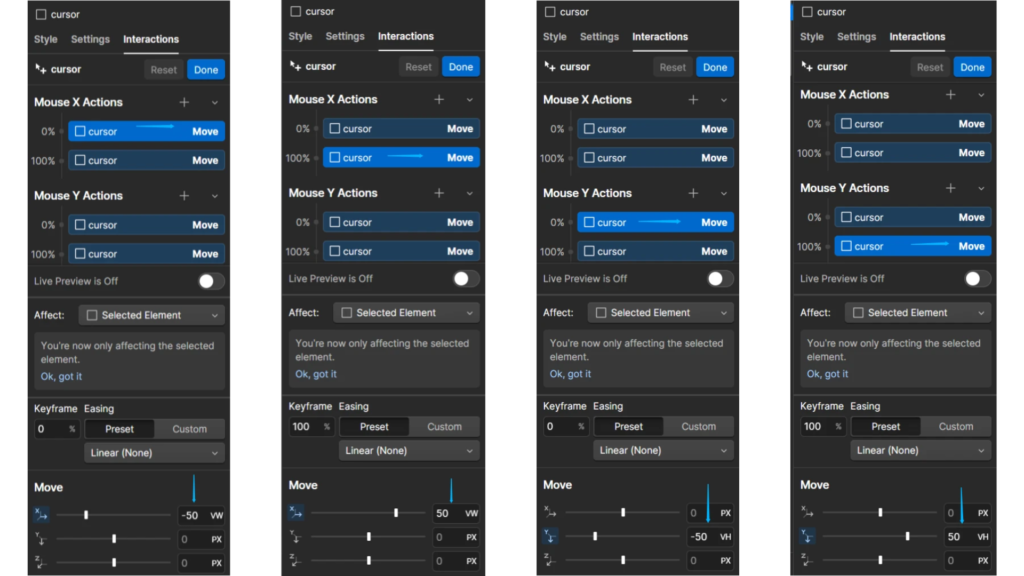
Select (Cursor) > Interaction > Page Trigger > Mouse Move (select)

Select (Play Mouse Animation) > Make Own Animation > Type Name
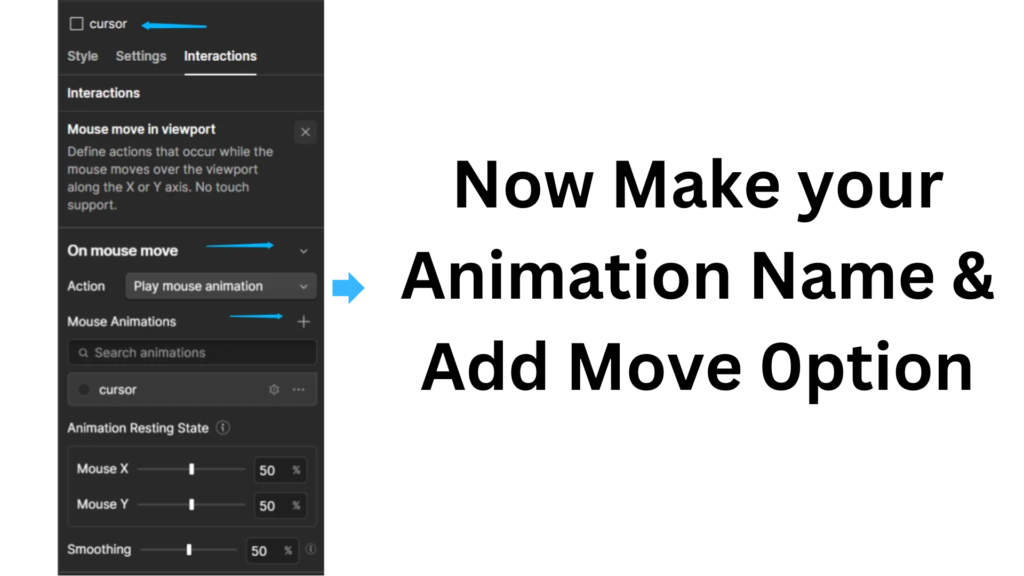
Add Move (X-Actions) > On 0% set -50vw > On 100% set 50vw
Add Move (Y-Actions)> On 0% set -50vh > On 100% set 50vh
Save your interactions, then check the functionality to ensure everything works as expected. Finally, publish your site to see the custom cursor in action.
Once your custom cursor is complete, check its functionality. If you want to use the default cursor alongside your custom one, select the body element and style the cursor to its default setting.
Recap
Creating a custom cursor in Webflow without coding involves three simple steps: First, set up your layout by adding and styling “Cursor Wrap” and “Cursor” divs. Next, ensure the “Cursor Wrap” covers the entire site with a fixed position and disable the default cursor. Finally, style your custom cursor and apply interactions to make it responsive to mouse movements.
Once done, test and publish your site to see the custom cursor in action. This guide should help you enhance your site’s user experience with a unique and engaging custom cursor.
Benefits of Using Webflow Custom Cursor
- Better User Experience: Custom cursors make your website more fun and interactive, giving visitors a unique experience.
- Stronger Brand Identity: A unique cursor can help reinforce your brand’s identity, making your site more recognizable and memorable.
- Increased Engagement: Interactive cursors can encourage visitors to explore more pages, keeping them on your site longer.
- Fun and Playfulness: Adding a playful cursor can make your site more fun and enjoyable, creating a positive impression and encouraging repeat visits.
- Creative Expression: Custom cursors allow you to show off your creativity and make your website stand out.
- Improved Navigation: A well-designed custom cursor can guide users through your site, making it easier to navigate and find important elements.
Ready to transform your online presence with Webflow? Contact Weboxy Technology, a leading Webflow development agency, for stunning, high-performing websites that captivate your audience!