
Transferring your website or workspace in Webflow can feel like a daunting task, but with the right guidance, it can be a smooth and stress-free process. Whether you’re looking to move your website to another Webflow account or workspace, understanding the steps involved will save you time and ensure your data remains intact.
Don’t worry, though! This guide is designed to walk you through the process step-by-step, making it easier for Webflow users to manage transitions efficiently and avoid common pitfalls.
By the end, you’ll have the confidence to handle your Webflow transfers seamlessly, keeping your projects and workflows on track.
Why You Might Need to Transfer your Webflow Website
Before getting into the how-tos, it’s worth understanding the why. Transferring a Webflow site or workspace becomes necessary in various scenarios, including:
- Collaborating with a new team and needing to unify project files under the same workspace.
- Selling a complete Webflow site as a freelance developer or agency.
- Restructuring your business, requiring you to consolidate resources.
- Hiring a freelancer to update or redesign your Webflow website, which may require transferring project ownership to give them full access.
Whatever your reason, transferring projects in Webflow is user-friendly when done the right way. And we’re here to ensure you follow best practices all the way through.
Step-by-Step Guide to Transfer Webflow Website
Step 1: Prepare Your Project
Preparation is key to a smooth transition. Start by ensuring your project is in top shape:
- Publish and test your site. Ensure all links, functionality, and integrations are working perfectly before the move.
- Back up your site. Use Webflow’s backup feature to create a copy of your project in case anything goes amiss during the transfer.
- Export essential data. If your site includes a CMS (like blogs), export your CMS data into a CSV file for safekeeping.
Step 2: Understand Workspace Permissions
When transferring to a new workspace, keep in mind that only the owner of the Webflow project can initiate the transfer. If you aren’t the current owner, reach out to them to get the ball rolling.
Important note: The receiving workspace should have Project Slots available. If their plan doesn’t allow additional slots, the transfer won’t go through.
Step 3: Transfer the Webflow Website
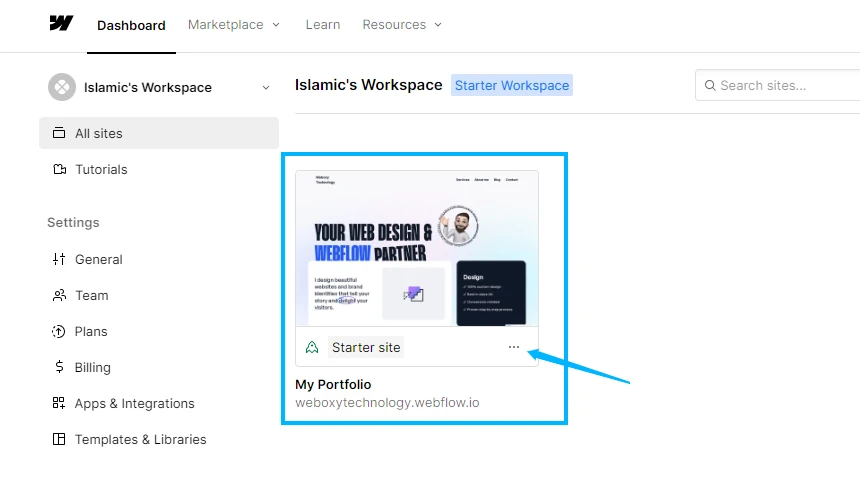
1. Navigate to Your Webflow Dashboard
By opening your Webflow account, you will see all your sites in your webflow dashboard. Select the one you want to transfer to another account. When you hover over the selected site, you will see three dots indicating view options. Click on these dots to open the site settings.
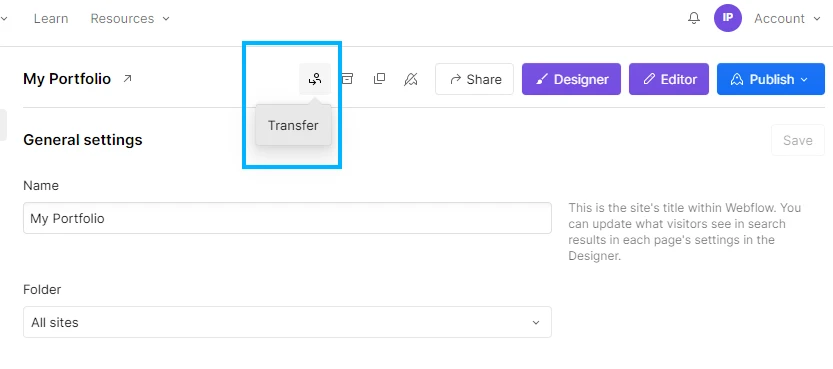
2. Access Project Settings
After opening your selected website’s settings, you will be able to explore various site features. To transfer the site, locate the transfer option highlighted in the image above. It’s a small icon that you need to select to initiate the transfer process.
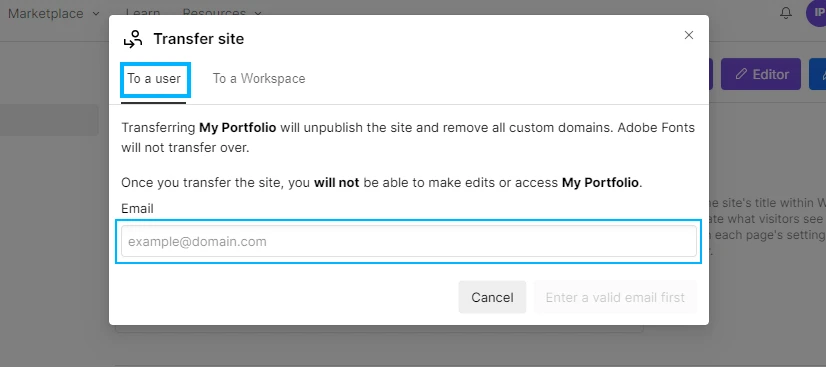
3. Initiate Transfer
When you click the transfer icon, a popup will appear where you can select options to transfer the site to either a user account or a workspace.
In the “To a user” section, you can transfer your website to another Webflow user. Select this option and enter the email address of the Webflow user who will receive the project.
4. Confirm the Transfer
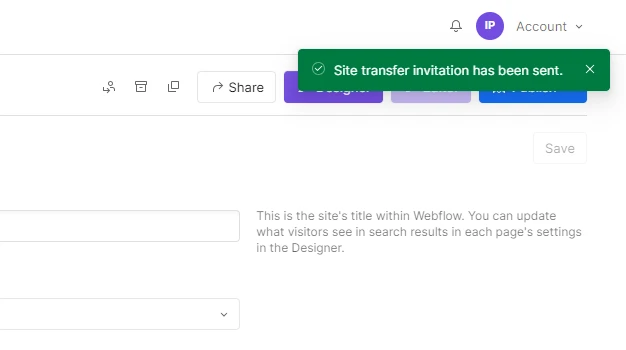
After entering the Webflow user’s details for transferring the site, you can review and confirm the information provided. Within moments, a highlighted popup will appear, confirming that the site transfer invitation has been successfully sent. This streamlined process ensures prompt communication and efficient handling of site transfers between accounts.
5. Accepting The site
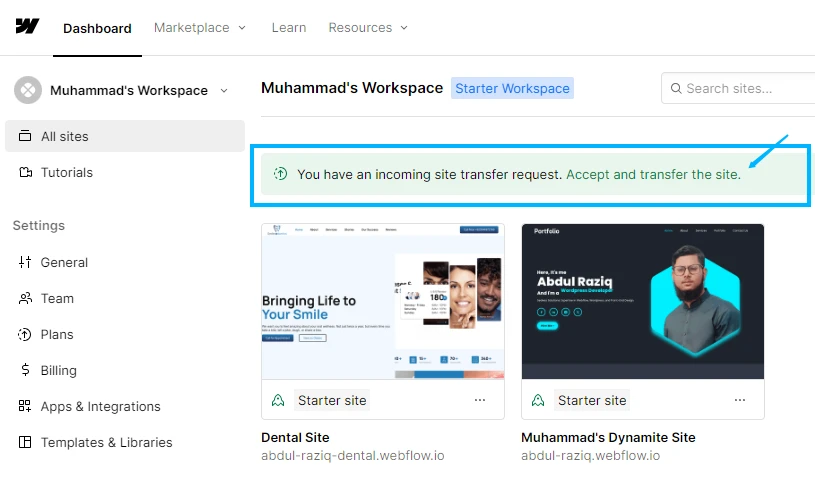
Now that you have completed the process of transferring your Webflow website, the recipient will receive a link on their Webflow account to accept the site transfer. The user can then select and accept the transfer of the site.
6. Backup Confirmations
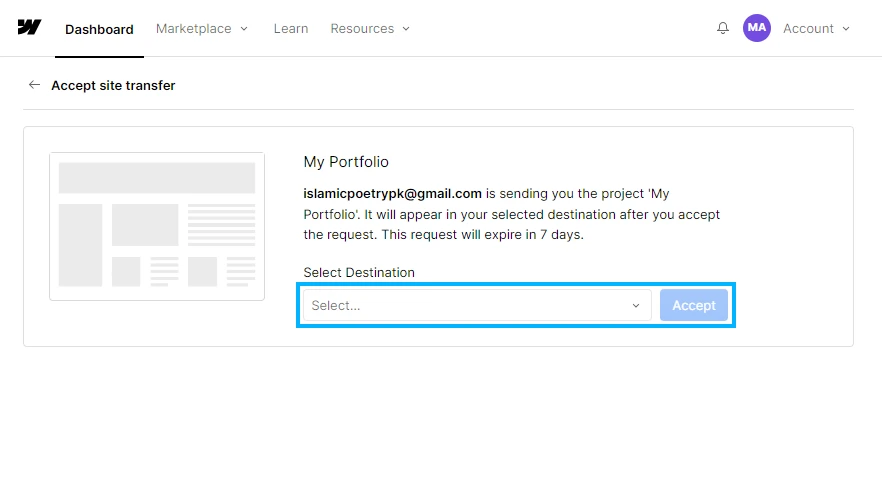
The recipient will receive the transfer request, which remains valid for 7 days. After this period, the transfer link will expire, and the transfer request will be automatically revoked. Confirm the site transfer by accepting the option, where a small screen will prompt you to select the destination for the transferred site and configure the acceptance.
Here is a complete guide on How to Transfer Your Webflow Website to Another Account, easily enabled by following our visual guides.
Effortlessly Migrating Elements Between Webflow Projects
If you’re not moving an entire project but simply need to copy elements (like reusable components or CMS content) between Webflow projects, here’s an easy guide for you.
1. Using Symbols for Reusable Content
Repeatable elements like headers, footers, or call-to-action components can be turned into Symbols:
- Navigate to your Project Designer.
- Highlight the element you’d like to copy and click Create Symbol.
- Export the Symbol and re-import it in the new project workspace.
This is an efficient way to reuse components without rebuilding them.
2. Copying CMS Collections
Webflow doesn’t currently allow CMS collection copies across projects (at least not natively), but don’t fret! Here’s a workaround:
- Use the Export CMS to CSV feature.
- Import the CSV file into the new project.
- The CMS collection will be ready to use in your new workspace!
Collaborate Securely in Webflow
Instead of using the transfer feature in Webflow, consider inviting team members to collaborate within your workspace. This approach reduces the risks associated with transferring projects, such as losing data or encountering compatibility issues. By inviting others, you retain full control over your website and its content while allowing seamless collaboration. This method ensures greater security, as no project ownership is handed over, and you can manage permissions to safeguard your work effectively.
Inviting Freelancers to a Workspace
Instead of transferring your webflow site, you can invite freelancers or collaborators to your workspace to work directly on your project. This approach allows you to retain control of your site’s hosting and plan while providing them with the necessary permissions to edit and contribute. Here’s how to invite freelancers to a Webflow workspace:
- Navigate to Workspace Settings
Log in to your Webflow account and go to your workspace. Click on the Settings tab for the workspace where your site is located.
- Access the Members Section
Within the Settings menu, find and select the Members tab. This section allows you to manage who has access to projects within your workspace.
- Send an Invitation
Click on the Invite Members button and enter the freelancer’s email address. You can also specify their role, such as Editor or Designer, depending on the level of access you want to grant them.
- Assign Permissions
Choose project-specific permissions if needed. For example, you can limit their access to certain tasks or ensure they have full design capabilities depending on the project’s needs.
- Confirm and Send
Once all details are set, click Send Invitation. The freelancer will receive an email to join your workspace.
By inviting freelancers directly to your workspace, you can streamline collaboration without having to transfer site ownership or downgrade your plan.
Conclusion: Key Takeaways for Transferring and Collaborating in Webflow
Transferring your website or workspace in Webflow may seem challenging, but with the right steps, it becomes an organized and stress-free process. Whether you’re moving a site to another workspace or inviting collaborators, preparation and understanding are essential.
To ensure a seamless transition:
- Back up your website and test its functionality before initiating a transfer.
- Familiarize yourself with workspace permissions and limitations.
- Follow the transfer process carefully, ensuring the recipient is ready to receive the project.
Alternatively, if security is a concern, consider inviting team members or freelancers to collaborate directly in your workspace. This approach retains control over your project while allowing efficient teamwork and safeguarding sensitive data.
By following these strategies, you can confidently manage Webflow transitions, streamline collaboration, and maintain the integrity of your projects.
Explore more Webflow insights or browse the Webflow category for articles packed with valuable information.